AWS Platform Guide
Set up accounts
This is an advanced topic for platform engineers.
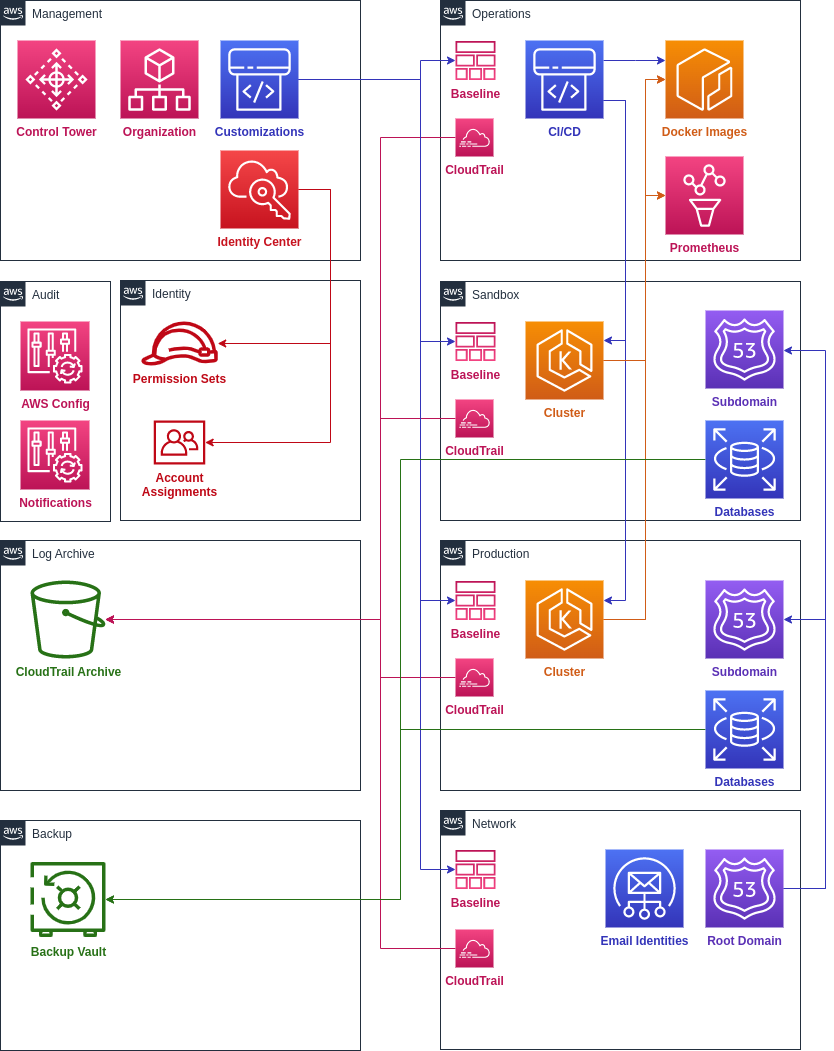
In order to fully deploy the platform, it’s recommended to set up the conventional accounts:
- Operations: CI/CD pipelines and centralized monitoring
- Network: centralized DNS and networking
- Sandbox: staging and development workloads
- Production: production workloads
- Identity: permission sets and identity provider
- Backup: backup policies and isolated vaults
You can provision the standard accounts using the landing zone repository template.
It may take some time for all the required accounts to be provisioned. Once all the accounts are fully enrolled, you are ready to create VPC networks.
Configure Single Sign On
- Configure your SSO identity store using the single sign-on guide.
- From the Single Sign-On configuration page, customize the start URL for your user portal so that it’s easier to remember (Note, your start URL cannot be modified once it has been customized).
- Delegate IAM administration from the Management account to the Identity account following the delegated administration guide.
- Accept the invitation in your email to join AWS SSO.
- Sign out of the IAM management user and sign into the newly created SSO portal.
You can find detailed instructions for specific identity providers:
Google Sign In
You will need to be an administrator for the Google domain to follow these instructions. This may require setting up a screen sharing session with somebody else who has access.
There is a difference between an admin for Google Cloud and Google Workspace. Make sure the owner of the service account is an admin for Google Workspace and are able to access the Google Admin Console.
If you’re using Google as a sign-in provider, you’ll also want to deploy the sso-sync Lambda to automatically provision user accounts in Identity Center. Otherwise, users will need to be manually added in both Google and AWS.
- Set Google as an external identity provider using the above guide.
- You should have a Identity account for managing SSO identities. This
is created if you’re using the
accounts.yamlfile from the template. - Deploy the sso-sync Lambda to the Identity account using the instructions below.
SSO Sync Lambda
From the Google cloud console, create a new project for the Lambda’s credentials. Give it a name that makes it clear why the project exists, such as “aws-google-sso-sync.”
To be performed by Google Admin:
Follow the Google tutorial to create a service account:
- In the Google Cloud console, go to IAM & Admin > Service Accounts.
- Click Create service account.
- Give your service account a name and description, then click Create and continue.
- Click Continue.
- Click Done.
Create credentials for your service account:
- Click Keys > Add key > Create new key.
- Select JSON, then click Create.
- Make a note of the downloaded credentials file.
- Click Close.
- Expand Advanced Settings.
- Save the Client ID under Domain-wide Delegation.
Now enable the Admin SDK:
- In the Google Cloud console, go to APIs & Services > Enabled APIs & services.
- Click Enable APIs and Services.
- Search for Admin SDK API.
- Click the Enable button.
Now enable domain-wide delegation for your service account:
- From the Google admin console, go to Security > API Controls > Domain-wide Delegation.
- Click Add new.
- Fill in the Client ID for the service account you saved earlier.
- Under OAuth scopes, specify the following: https://www.googleapis.com/auth/admin.directory.group.readonly https://www.googleapis.com/auth/admin.directory.group.member.readonly https://www.googleapis.com/auth/admin.directory.user.readonly
- Click Authorize.
To be performed by Infra Dev:
Enable SCIM for your Identity Center directory:
Sign into the Identity account from your AWS landing zone.
From AWS IAM Identity Center settings, within the Automatic provisioning information box, choose Enable.
Save the displayed SCIM endpoint and Access token.
Create a new Terraform module in the infrastructure repository under
sso-sync/secretsto store the credentials:module "secret" { source = "github.com/thoughtbot/terraform-aws-secrets//secret?ref=v0.8.0" description = "Secrets for deploying the AWS/Google SSO Sync Lambda" name = "aws-google-sso-sync" initial_value = jsonencode({ GoogleCredentials = "" SCIMEndpointAccessToken = "" SCIMEndpointUrl = "" }) }Apply the Terraform module.
From AWS Secrets Manager, find the created secret.
Click Retrieve Secret Value and then click Edit.
Copy the contents of the JSON credentials file you downloaded into the GoogleCredentials field.
Fill in the SCIMEndpointAccessToken and SCIMEndpointUrl values you saved earlier.
Click Save.
Create a new Terraform module in the infrastructure repository under
sso-sync/lambdato deploy the SSOSync Lambda:module "lambda" { source = "github.com/thoughtbot/terraform-aws-google-sso?ref=v0.1.0" google_admin_email = "[email protected]" google_credentials = local.secrets.GoogleCredentials google_group_match = "email:aws-*" name = "aws-google-sso-sync" scim_endpoint_access_token = local.secrets.SCIMEndpointAccessToken scim_endpoint_url = local.secrets.SCIMEndpointUrl semantic_version = "2.0.2" } locals { secrets = jsondecode( data.aws_secretsmanager_secret_version.sso_sync.secret_string ) } data "aws_secretsmanager_secret_version" "sso_sync" { secret_id = "aws-google-sso-sync" }Apply the module.
IAM Identity Center will now automatically synchronize matched groups and users from your Google domain.
Updating the SCIM Token
You will need to regularly update the SCIM token as it expires to continually provision users and groups: Update SCIM tokens
Microsoft SSO
References
- https://learn.microsoft.com/en-us/azure/active-directory/saas-apps/aws-single-sign-on-tutorial
- https://www.youtube.com/watch?v=WSd0POCqklY
Note:
When following the above youtube tutorial and creating a non-gallery SSO app, we encountered an issue that was due to duplicate users in AWS. Therefore, we need to ensure that existing groups don’t have users with the same email in Microsoft. It may be best to use the “AWS IAM Identity Center” application from the Microsoft enterprise app gallery. The following instructions still apply except for the initial bullet point for app creation in Microsoft section
Prerequisites
- Identify AWS groups with the appropriate target permission sets / account assignments
- Ensure those same group names exist within Microsoft
- Owners / members should be set appropriately
- Create backup IAM admin user with access to identity center in AWS in case changes need to be reverted
In AWS
- Change IdP to external
- Download metadata file
In Microsoft
- Create new enterprise app (non-gallery app)
- In single sign-on section, select SAML
- Upload metadata file from AWS
- Save the SAML config
- Download federation metadata xml
In AWS
- Upload metadata file from Microsoft
- Finish changing identity source
- Enable automatic provisioning
- Copy SCIM endpoint / access token for use in Microsoft
In Microsoft
- In Provisioning section, set mode to automatic
- Set tenant url to SCIM endpoint, secret token to access token (from the previous AWS provisioning setup screen)
- Test connection
- Save provisioning config
- Make sure to assign groups to enterprise app
- Then start provisioning
AWS Platform Guide
The guide for building and maintaining production-grade Kubernetes clusters with built-in support for SRE best practices.
Source available on GitHub.