It’s common to host a blog on wordpress.com, wpengine.com, or to use a
self-installed blog on AWS or Heroku. If you have the option of hosting your
blog on https://blog.example.com, please just do that and stop reading now.
It’s much easier. But if you’re familiar with terms like SEO, “link juice”, or
“google juice”, and someone is telling you that it’s better to host your blog in
a subdirectory instead of a subdomain, then I’m sorry and you may wish to keep
reading.
Let’s discuss how to serve your Wordpress, Blogger, or other external blog site as a subdirectory of your www or apex domain using solutions such as NGINX, rack-reverse-proxy, and Fastly. Fastly is basically Varnish-as-a-service. If you’re running your own Varnish cache, you are not the intended audience for this blog post.
We will imagine that your website is https://www.example.com and your blog is
available at https://blog.example.com. You want to make your blog available at
https://www.example.com/blog.
Reverse proxying
A reverse proxy is the best way to serve content from one website through
another. This means that when a browser requests
https://www.example.com/blog/2017/10/6/best-marketing-blog-post-ever, it
communicates only with the web server found at www.example.com. The web
server, in turn, forwards this request to
https://blog.example.com/2017/10/6/best-marketing-blog-post-ever and it
returns the content on behalf of the other server. The browser never knows the
content came from a third-party server.
NGINX
If you’re using a host like AWS, Slicehost, or Linode, you’re likely using NGINX
as your web server. NGINX has a
reverse proxy
feature that will easily allow you to serve content from another website under a
subpath like /blog. The configuration is simple, and the performance is pretty
great. The configuration, at its simplest, is something like this:
location /blog/ {
    proxy_pass https://blog.example.com;
    proxy_set_header Host $host;
    proxy_set_header X-Real-IP $remote_addr;
    proxy_set_header X-Forwarded-For $proxy_add_x_forwarded_for;
    proxy_set_header X-Forwarded-Proto $scheme;
}
Heroku
If you’re on Heroku, you don’t have access to the web server configuration. In this case, the easiest option is to set up the reverse-proxy in your application with something like rack-reverse-proxy. The example in the Options section of the README has the exact solution you’ll probably need to proxy your blog through your ruby app.
This works fine, but we’ve seen it eat quite a bit of dyno memory. For example,
on a recent project utilizing Heroku’s PM dynos, which provide 2.5GB of RAM, we
routinely started maxing out memory when using rack-reverse-proxy. This lead
us to consider other options and eventually move to Fastly. After switching
over, we saw our memory usage drop by about 700MB. YMMV.
Serving /blog with Fastly
Fastly is an “edge cloud platform”, which basically
means it’s a hosted and managed
Varnish Cache.
If you follow the DNS
to CDN to Origin post from Dan
Croak and the Guide to Caching Your Rails Application With
Fastly
post from Jessie Young, you’ll be up and running with Fastly acting as a
reverse-proxy for your entire www domain. Besides the advantage of edge
caching and distributed content delivery, you can now configure any path on your
domain to be served from a different origin.
Fastly configuration
To configure this in Fastly, add an Origin with a condition like
req.url ~ "^/blog".
Here’s what that looks like in Fastly:

The condition is simply a matcher for the request URL that activates the Origin
rule. This means that any request to www.example.com that starts with /blog
will be forwarded to the defined origin. Now you’re reverse-proxying! We’re not
quite done yet, though.
Wordpress configuration
On the Wordpress side, you’ll want to configure your blog’s settings to work with this new configuration.

If you’re not using a CDN on your blog for assets
The following is necessary if you don’t have a CDN configured for your assets on your Wordpress blog.
In the simplest configuration, the WordPress Address (URL) should be
https://blog.example.com and not https://www.example.com/blog. This means
that all assets from the blog will be served from https://blog.example.com
directly. They will not be reverse proxied through Fastly. This avoids a path
problem for forwarded requests so that
https://www.example.com/blog/images/logo.svg doesn’t get forwarded to
https://blog.example.com/blog/images/logo.svg when it needs to actually be
https://blog.example.com/images/logo.svg. It’s possible to write some Custom
VCL on Fastly that rewrites the URL before it forwards it to the actual blog
domain to remove the /blog path prefix, but I’ll leave that an exercise for
the reader.
CORS
With this configuration, blog posts are now loading under /blog on
www.example.com, and assets from the blog are coming from a different
domain: blog.example.com. This brings us to Cross-origin resource
sharing, or CORS.
If we do nothing else, the assets will not load on the blog. Browsers block
requests to other domains unless they explicitly allow these requests.
Because of this, be sure to enable an
Access-Control-Allow-Origin
header for your assets on your blog’s web server (the blog.example.com one),
or on your CDN. The Enable CORS
website has some useful information on configuring NGINX, as well as links to
various resources with more information on implementing CORS.
Fastly TLS
You’ve probably noticed that all of these examples use HTTPS for their protocol. This requires a custom setup and upgraded pricing plan with Fastly. You can get away without HTTPS and use a much less expensive Fastly plan, but, really, we should be using HTTPS for everything, right?
When you have Fastly proxying your blog using HTTPS, you’ll want to enable a “Force TLS” setting in Fastly. It’ll look something like this:

This will ensure that all requests are forced over HTTPS, and that the
X-Forwarded-For header is handled properly.
A real-world example
If you’d like to see a real-world example of this in action for something other than a blog, take a look at thoughtbot’s Upcase. thoughtbot.com and Upcase both run on Heroku as separate apps. However, Upcase is served as a path under thoughtbot.com using Fastly as a reverse-proxy. Here’s the configuration on Fastly:
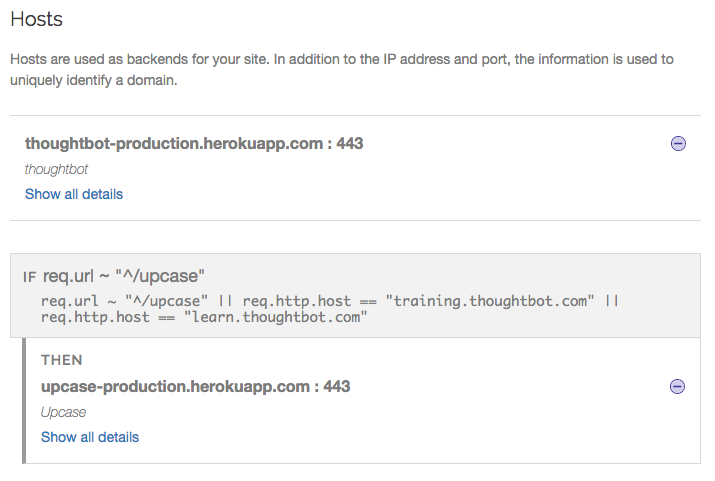
Upcase is a Rails app running on https://upcase-production.herokuapp.com. However, its canonical hostname is thoughtbot.com, so you are redirected to the correct address whenever visiting Upcase. This redirect to the canonical hostname happens at the Rails application level, not at Fastly.
A workaround for a redirection problem we ran into
During the domain switch from upcase.com to thoughtbot.com/upcase, we ended up with the situation where you could go to upcase.com/upcase, which wasn’t really helping out with our “google juice”. We tried other configurations but ended up with infinite loops and such. The solution we landed on was to have Fastly set a header so when it requests the page from Upcase, it’s allowed.
This is configured in a middleware in the Rails app.
Rails.configuration.middleware.insert_before(Rack::Runtime, Rack::Rewrite) do
  not_thoughtbot_proxy = lambda do |rack_env|
    rack_env["HTTP_X_THOUGHTBOT_DOT_COM_PROXY"].blank?
  end

  if Rails.env.production?
    PATH_PATTERN = %r{^(?:/upcase)?(/.*)}
    REPLACEMENT_TEMPLATE = "https://#{ENV.fetch('APP_DOMAIN')}/upcase$1".freeze

    r301 PATH_PATTERN, REPLACEMENT_TEMPLATE, if: not_thoughtbot_proxy
  end

  # ...
end
If it’s not Fastly, we redirect to the correct URL.
In Fastly, we then set the header with a setting like this:

So, now we know the request is coming from Fastly and we can act accordingly. For this configuration, we roughly followed Fastly’s instructions for configuring headers on HTTP requests and responses.
Taking it further
We’ve really only scratched the surface of what’s possible with Fastly. From this point, you can start caching your blog at the edge and improving load times for your users. You can get into traffic distribution and DDoS mitigation, and all kinds of fun stuff.
