If you practice continuous deployment, it’s important to deploy without downtime. Otherwise, you don’t have continuous delivery; you have continuous downtime.
If you’re deploying your application to Kubernetes, you already have all the pieces you need to ensure your deployments run without downtime. However, figuring out how to piece them all together for a Rails application can be something of a challenge!
This post will walk through the major steps to get a Rails application running in Kubernetes, deployed without downtime.
Containers
Kubernetes runs containers using images built according to the OCI container format. These images are most commonly built using Docker, but other tools like buildpacks and podman are available as well.
To deploy a Rails application to a Kubernetes cluster, the first thing you’ll need is a container image for your application. Images for your application will live in a container image repository with a URL, like:
docker.io/mycompany/myapplication:tag
Each time you build an image for your application, you can give it a new tag. I recommend tagging your images to match the Git commit the image is built from, so you’ll end up with image URLs that look like this:
docker.io/mycompany/myapplication:abcd123
To build a container image using Docker, you’ll need a Dockerfile. After that, you can build, tag, and push your image:
docker build . --tag myapplication:latest
docker tag myapplication:latest docker.io/mycompany/myapplication:abcd123
docker push docker.io/mycompany/myapplication:abcd123
Most teams will want to automatically build these images during Continuous Integration.
Deployment
Once you have an image built, you can tell Kubernetes you want to run pods using that image:
# deployment.yaml
apiVersion: apps/v1
kind: Deployment
metadata:
  name: rails
  # ...
spec:
  # ...
  template:
    # ...
    spec:
      containers:
      - name: main
        image: docker.io/mycompany/myapplication:abcd123
kubectl apply -f deployment.yaml
Whenever you want to deploy a new version of your application, you can update the manifest to use the latest tag of your container image, and Kubernetes will perform a rollout of the new version.
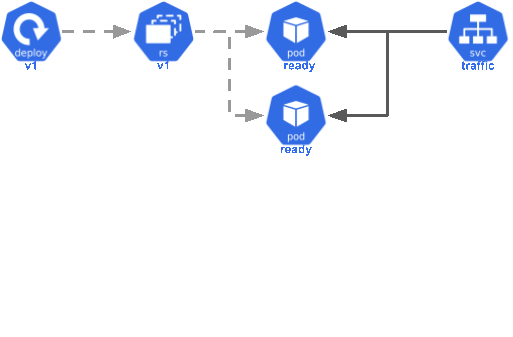
Rollout
Kubernetes will roll out the release for you by creating and scaling replica sets. The rollout strategy is customizable, but Kubernetes will utilize a rolling release by default. A simple rolling release looks like this:
- Kubernetes creates a new replica set matching the updated deployment.
- Kubernetes will launch a new pod matching the new replica set.
- Once the pod is marked as ready, the pod will begin receiving production traffic.
- Kubernetes will terminate a pod from the old replica set.
- Steps 2-4 are repeated until the new replica set is running the desired number of pods and the old replica set is scaled down completely.
This process means that new containers are slowly brought online and traffic gradually shifts over to the latest version. This avoids a period during the deploy where pods are unavailable to serve traffic, all traffic shifts at once to pods with cold caches, or many extra containers boot at the same time, overwhelming the database with new connections. This is a good, default recipe for a zero downtime deploy.
However, you’ll need to provide Kubernetes some extra information to make sure this process runs smoothly for your Rails migrations.
Readiness Probes
Kubernetes needs to know when your pods are ready to begin receiving production traffic. There will be a period after starting your new container when it’s loading application code, connecting to databases, and otherwise getting ready to serve traffic. Kubernetes to know when this period is over to avoid prematurely moving forward in the deployment.
For a Rails application, making an HTTP request is a good safe bet:
spec:
  containers:
  - name: main
    image: docker.io/mycompany/myapplication:abcd123
    readinessProbe:
      httpGet:
        path: /robots.txt
        port: 3000
        scheme: HTTP
After updating your deployment.yaml file, you can re-apply it to update:
kubectl apply -f deployment.yaml
Adding this to your deployment tells Kubernetes to wait until a request to
/robots.txt responds with a 200 before marking the pod as ready. This will
pause the deploy until your application server (such as Puma) has loaded your
application and is ready to respond to user requests.
If something prevents your application from reaching the point where it can fulfill this readiness probe, the rollout won’t move forward and the old version will continue running uninterrupted. This means that you won’t bring down production by forgetting to add a new environment variable. The rollout will keep trying to restart and probe the container until it responds successfully.
Migrate Job
Most Rails applications will utilize a database like Postgres, and this means keeping the database schema synchronized with the application. This is easy to do with Rails migrations, but you need a way to tell Kubernetes to run the migrations. One good way to do this is by using a Job:
apiVersion: batch/v1
kind: Job
metadata:
  generateName: db-migrate-
spec:
  template:
    spec:
      containers:
      - name: main
        command:
        - rails
        - db:migrate
        image: docker.io/mycompany/myapplication:abcd123
A Job works like a Deployment, but rather than keeping a certain number of pods running at all times, it runs your pod until it completes successfully and then stops. You can create a new migration job for each new version in your CD pipeline.
Init Containers
You can start your migration job at the same time as you update your deployment to use your new image tag, but you’ll need to make sure the migrations complete successfully before trying to start the Rails application. Otherwise, the new code will attempt to use database columns that don’t exist yet, which will cause application errors.
You can make sure your containers wait for migrations to complete by adding an initContainer to your deployment manifest:
spec:
  containers:
  - name: main
    image: docker.io/mycompany/myapplication:abcd123
  initContainers:
  - name: migrations
    image: docker.io/mycompany/myapplication:abcd123
    command:
    - rake
    - db:abort_if_pending_migrations
Kubernetes will run the migrations container before trying to start the main
container. This built-in rake task will exit with an error if migrations are
pending. If an initContainer fails, Kubernetes will restart it until it
completes successfully. This means that your main container won’t start until
migrations complete successfully, and the pod won’t be marked as ready until the
database schema it needs is in place.
Migration Gotchas
One downside to using a rolling release is that multiple versions of your application will be running at the same time during a rollout. If you run migrations while old versions of your application are running, this means your migrations must be backwards compatible for at least one deploy. Most migrations will work fine as-is, but it means handling some changes with care:
- If you add a new, non-nullable column, you’ll have to provide a default value.
- Deleting a column that’s still in use will cause application errors. Release a version that doesn’t use the column first, and then remove it in a subsequent release.
- Renaming tables or columns is likely to cause issues. You may want to deploy code that uses an alias first, and then rename it in a subsequent release.
This requires a little extra vigilance, but it makes for effortless zero downtime deploys. As a bonus, it makes it easier to roll back a release in case something goes wrong as well.
Putting It All Together
With all these pieces in place, you can deploy continuously without interruptions or errors, automatically running database migrations as you go.
In case you’re looking for a set of manifests to serve as the base of your own deployment, I’ve put together a Gist containing a fuller example.
