Animation plays a vital role in the products we use every day, providing feedback, intrigue, and delight to the people that use it. Often, the use of animation is subtle, but when implemented effectively it has the potential to improve usability and to push a product from good to great, bringing an added level of polish to interface and product design.
So why do we animate, and how can we benefit from using animation in UI design? Utilizing animation in certain scenarios allows us to accomplish lots of different tasks. For example, we can use animation to provide feedback from an event such as a click, tap, or hover. We can use it to affirm or alert a user to certain behavior, such as a confirmation or alert message. We can also use it simply to enhance the emotional connection that the user has with the design.
Animation is great, but one thing that makes it hard is not knowing exactly how we want something to animate before we actually build it. Planning ahead for complex animations can save us a lot of time during implementation. It can also help us to plan and test animations while collaborating, as it is much easier to show an animation than to explain one. In this sense, I find it beneficial to know exactly how I want something to animate before I spend time writing the code that will execute it (this may not apply to extremely simple animations and effects).
Prototyping an animation can be done in many different ways, and there are an equal number of tools available today that attempt to help us accomplish this (Designer and co-worker Andrew Cohen recently wrote an excellent blog post on animating in Keynote). One tool that has been around for quite some time and that is now often overlooked is Adobe After Effects (AE). Most people associate AE with complex animation and are intimidated by its complexity, and for good reason: AE is robust. Too robust, in fact, for what most UI designers would ever need to use it for. We will find however, that such a tool, while daunting, can be perfectly suited for animation prototyping, as long as you can look past unnecessary features. Once an individual becomes comfortable with the foundations of animation in AE, they will find that they can do quite a lot with very little.
Let’s Get Started
To start, let me reiterate that there is a lot to the AE interface that we don’t need to worry about for now. AE is a powerful tool for animation, including animation in 3D, but most of the things we will be concerned about in this article are the basics: just the things that you need to know to get started. So don’t worry! Follow along and before long, you’ll be creating animations that inform and delight. Along with the foundational animation concepts of key-framing and easing, we will be focusing on animating the most basic properties: position, scale, opacity, and rotation. Having a mastery over the animation of these properties will allow you to accomplish most animations relating to UI.
Setting Up a New Project
In AE, projects are split up into compositions. A composition is simply a group of objects that are being animated. Compositions can be nested within other compositions (animations within animations) but we won’t worry about that for now. We will only be creating a single composition for our project, with objects animated within. To create a new composition, open up AE and select Composition > New Composition… from the application menu, or hit [⌘N]. This will bring up the Compositions Settings window. The items that we will be most concerned with in this window will the Composition name, width, height, and duration. You can also change things like background color. Let’s set it up to look something like this:

- You can also create compositions by importing files (ex. from Photoshop). By doing it this way, you can keep all the layers organized and can animate them individually, which is great. For the purpose of this article however, we will just be focusing on animating a single object, so we won’t worry about importing from other applications. Feel free to do your own research on this method, it’s quite straightforward.
Hit OK, and your composition will be created. Now, we have a composition, but nothing to animate! Let’s create a shape layer to animate by using the shape tool in the top toolbar, or by pressing [Q]. Draw your shape in the center of your composition. You can change the fill and stroke colors in the toolbar as well when you have the shape tool selected. Mine looks like this:

- Note that all of the examples in this article use a minimalist flat design. This is to demonstrate how even simple animations have the ability to create illusions of objects with physical properties (ex. velocity) moving through space, when in fact they only exist in two dimensions and have no real physical characteristics.
The Essentials
The essentials of animating in AE are layers, keyframes, and easing (although I would maybe consider easing a bonus rather than essential).
- Layers are pretty straightforward if you have used any other software that uses them: Layers on top will pass over layers underneath.
- Keyframes are the core of animation. Setting a keyframe tells the animation to take note of the state that the animation is currently in. When you set a new keyframe further down the timeline and change the properties of the object you are animating, the information in between the two keyframes gets filled in, resulting in a transition of animated properties from one keyframe or state to the next.
- Easing relates to the velocity and momentum of an object and its keyframes. You can tell and object to slow down or speed up as it reaches a keyframe that you have defined.
Let’s Animate
As mentioned previously, the properties that we will focus on here will be position, opacity, scale, and rotation. All of these properties are animated in a similar manner: by setting a keyframe, moving down the timeline, and setting another keyframe by changing the state of the object.
Position (P)
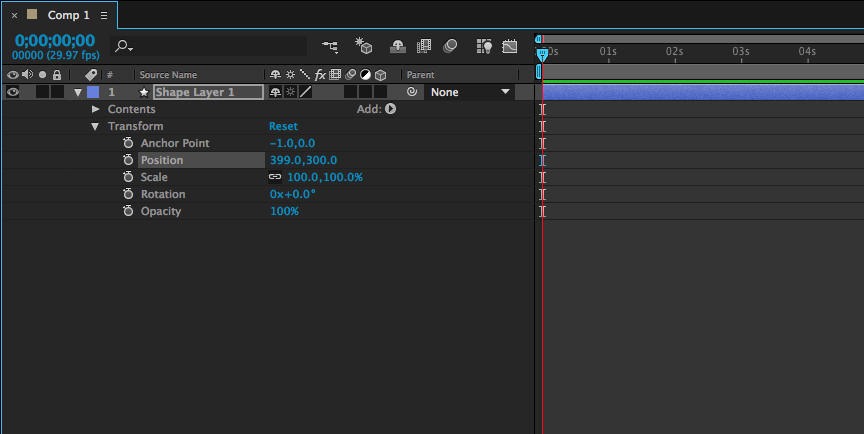
Let’s start off by animating the position property. With your shape layer selected, hit [P]. This will make visible the position property of your shape. Alternatively, you can access the property by expanding the dropdown menu of the layer in your layers panel:

Before setting our first keyframe, let’s prepare our object to animate in from offscreen. Select your shape and make sure you are using the selection tool [V]. Hold shift to constrain the movement, and move your shape just off of the canvas to the left. Now, move your attention down to the timeline and set the scrubber to 1 second into the animation by clicking the 01s marker. Set your first keyframe by clicking the stopwatch icon next to the position property of the layer. Your workspace should now look like this:

Back to the timeline. Move the scrubber down the timeline about a third of a second. With your selection tool [V] move your shape while holding down shift back to the center of your canvas. You’ll notice two things. The first is that a new keyframe has been set automagically! Wonderful. The second is that you can now see a visible string on your object indicating how your object’s state has changed. You’ve just created your first AE animation! You can see how the information between keyframes has been filled by dragging the timeline scrubber back and forth between them.
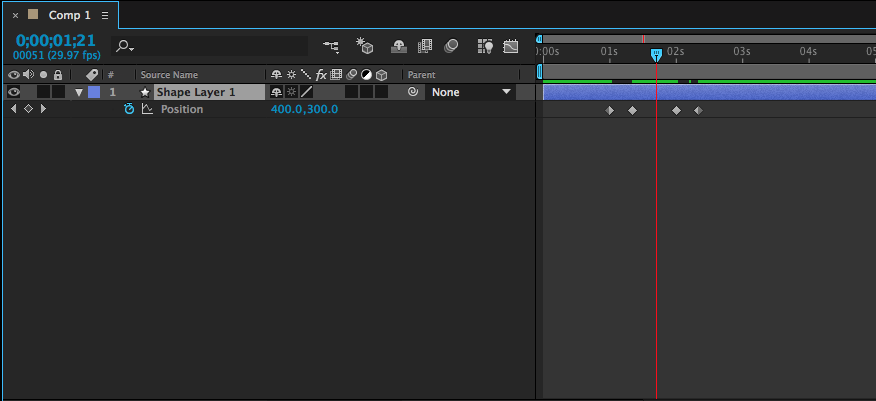
Let’s do it again! Move the scrubber down to two seconds (02s). Click the add keyframe icon (small diamond between two arrows to the left of the position property in the layers panel). This will create a third keyframe on the timeline without changing the state of the object. You’ll see why we do this in a minute. Once again, move the scrubber down the timeline a third of a second. Now, again with the selection tool, move your object off to the right of the canvas, remembering to restrain its movement by holding shift. You’ll notice that a fourth keyframe has been created. Now, as you go back and move the timeline scrubber between keyframes, you’ll see our animation play out with a period in the middle of the animation where our shape hesitates before animating off screen. Your keyframe structure should look like this:

Now For the Easing
- Easing determines the velocity at which the object animates from one keyframe to another. You can ease in and out of a keyframe and change the keyframe velocity, so the object appears to pick up speed or slow down at certain keyframes.
Right click your second keyframe, and from the menu, choose *Keyframe Assistant
Easy Ease. You will see the shape of the keyframe icon change to an hourglass. Right click it again, this time selecting *Keyframe Velocity… Change the Influence of the Incoming Velocity to 100%. This tells the object to speed up as it enters the keyframe. Click OK. Now let’s change the third keyframe, but this time, there is a slight difference. Edit the keyframe to be an Easy Ease keyframe. Open up the Keyframe Velocity… menu and this time, change the Influence of the Outgoing Velocity to 100%. This tell our object to start slow, and speed up as it exits the keyframe.
Previewing Our Animation
To preview the animation, drag the right end of the work area marker (gray bar below the time indicators on the timeline, to encompass just the area where your keyframes exist. It should highlight just a portion of your timeline, like this:

This will prevent AE from rendering the entire 30 seconds of our composition for the preview. Now, in the right preview pane, click the right most arrow to initiate a RAM preview (a rendered preview of our animation.) It will loop your animation until you stop it.
You’re done! Your animation should look something like this (although I have added motion blur to my object):

Other Properties
Although we have just animated the position property, other properties such as opacity [T], scale [S], and rotation [R], are all animated in the same way using keyframes. You will quickly find that animating different properties is simple once you understand the dynamics of keyframes and how to create transitions between states. Here are a few examples of simple animations for these other properties:
Opacity/Transparency [T]

Scale [S]

Rotation [R]

Putting It All Together
All of these properties, and all animatable properties that we haven’t discussed in this post, can all be animated simultaneously. For example, you can rotate an object while it moves it’s position across the canvas and gets bigger in scale. It’s all up to you how to animate the properties of an object and the keyframes associated with them.
Exporting
To export your composition, go to Composition > Add to Render Queue. This will open up the Render Queue panel at the bottom of your interface. When you have selected your render settings and the location you want to export to (Output To:), click the Render button on the right side of the panel.
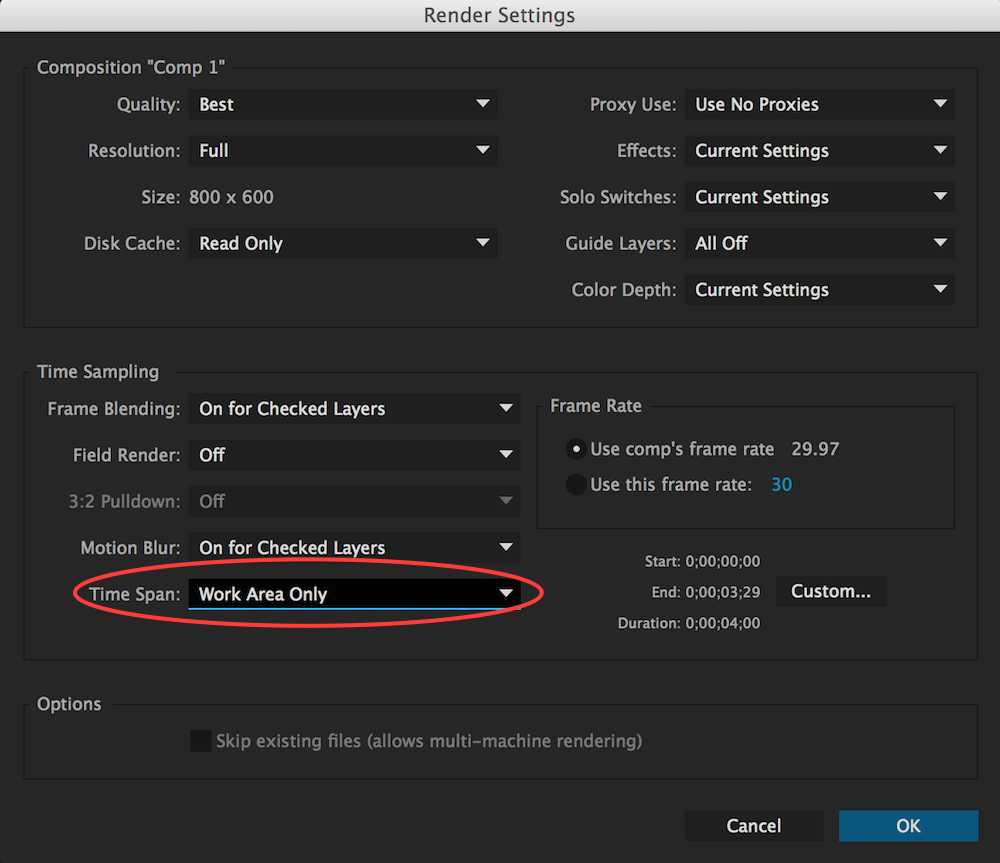
- One thing to note is that depending on your desired length for the final animation, you can change the Time Span to be either the entire length of the composition, or just the length of our adjusted work area from earlier. This can be accomplished under Render Settings:

Once it is finished, you’ll hear a ring and your animation will have been exported to a video file! You can now share it with co-workers, use it for your project, or convert it to a .gif to show off on Dribbble.
Conclusion
AE is a robust tool that has many more features than are needed to create simple animations. If you can master the basics, however, and acquire a solid understanding of key-framing and the animation of the main object properties, it can be a very useful tool for prototyping animations for UI and more. At first, it may seem cumbersome to navigate the interface, but you will quickly find that speed come with practice, and the more you master the basic principles of animating in the application, the more value you will find in it as a tool. Go animate all the things!